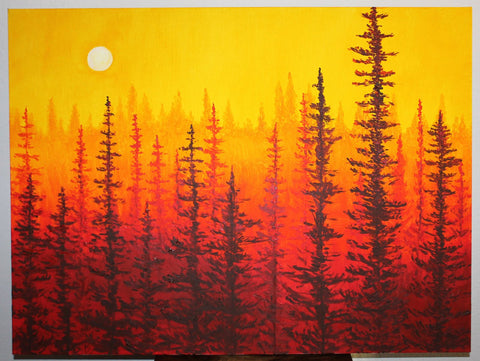

How to Paint "Forest at Dawn" Painting in 5 Easy Steps

I flew out to visit my best friend in southern California for a few days. She recently moved into a new house and they had a lot of big open spaces on their walls. There's nothing I dislike more than giant white walls so I decided to paint a picture. I knew I wouldn't have much time so I picked an easy old favorite. My "Forest at Dawn" but this time done in acrylics rather than oils so the layers would dry in time. I'm sharing a step by step photo tutorial of how it's painted so you can try one for yourself at home. It's a very easy, basic painting made by layering colors in organic tree-like shapes.
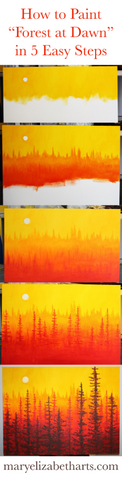
This painting only take 5 basic steps to create. Just follow the images below to create your own!
Let's Paint!
♦ Start with a large canvas and 4 tubes of Acrylic paint. Yellow, Orange, Red and Burnt Umber. Emily already had some white paint for the moon. So you'll want white as well, or you can just use the natural white of the canvas instead.
♦ You'll need 2 brushes. One really big one to lay in the large swatches and a skinny thin one for the trees. Acrylics are water based so you'll also need some water to thin the paint down and clean your brushes. Paper towels always come in handy. You'll also want something to mix the paint in. I just used aluminum foil wrapped around a plate but plastic plates work really well too.

Step 1:

Step 2:
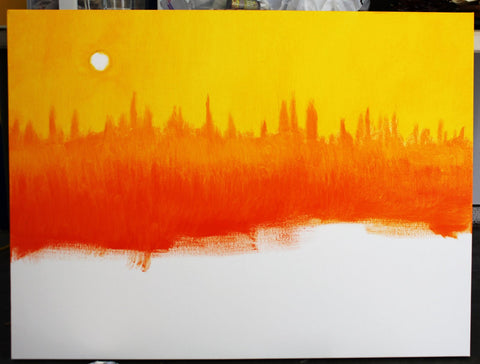
Step 3:

Step 4:

Step 5:


Ta-Da!